Retrieving an uploaded PDF file from an iMIS database

The developers at ASI, which produces the engagement management system iMIS, made an interesting choice for file management. Images uploaded through RiSE, iMIS’s content management system, are stored in a server operating system folder and can be accessed directly with a URL like https://www.example.org/images/sample.jpg. Document files, on the other hand, are stored as content records in the iMIS database, and can only be retrieved using special JavaScript links on a webpage that’s part of the iMIS website. What’s more, such links work only if they exist in the HTML that’s present on the initial page load; if you try inserting links into the HTML using JavaScript, they do nothing.

I still haven’t worked out exactly what sort of black magic happens behind the scenes to retrieve those files from the database when a user clicks on one of the special links, and generally speaking, it’s probably best to use the built-in mechanism for retrieving files. But what if you absolutely need to grab a specific file from the database on demand without using one of the preexisting links?

I’ve determined that it is possible to retrieve and deliver a PDF file stored in the database using the iMIS API. I’ll explain how you can do the same using a custom IQA query, an iPart containing the pdf-lib JavaScript library and the dandavis JavaScript download script, and a bit of JavaScript and jQuery.

About my environment

I should begin by mentioning that I’m developing using a self-hosted instance of iMIS 20.2.65.9955.

I have not tested these methods using an ASI-hosted iMIS installation or with any other version of iMIS.

Creating your IQA query

We’ll begin by using RiSE’s Intelligent Query Architect section to create our custom query. For the purpose of this tutorial, I’m using a folder named KB, and I’m giving my query the name DownloadPDF.

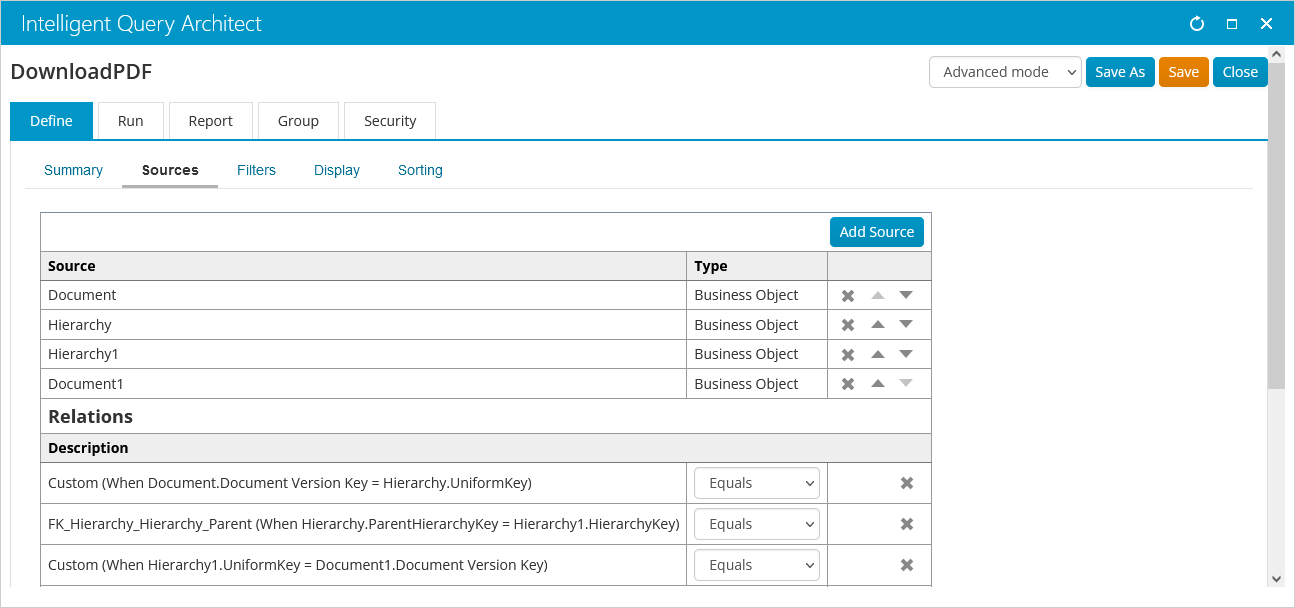
When you create your new IQA query, on the Sources tab, begin by adding Document and Hierarchy business objects listed in $/Common/Business Objects, then add an additional copy of each of those business objects. Join your sources on Document.Document Version Key = Hierarchy.UniformKey, Hierarchy.ParentHierarchyKey = Hierarchy1.HierarchyKey, and Hierarchy1.UniformKey = Document1.Document Version Key.

Screenshot of IQA Sources tab

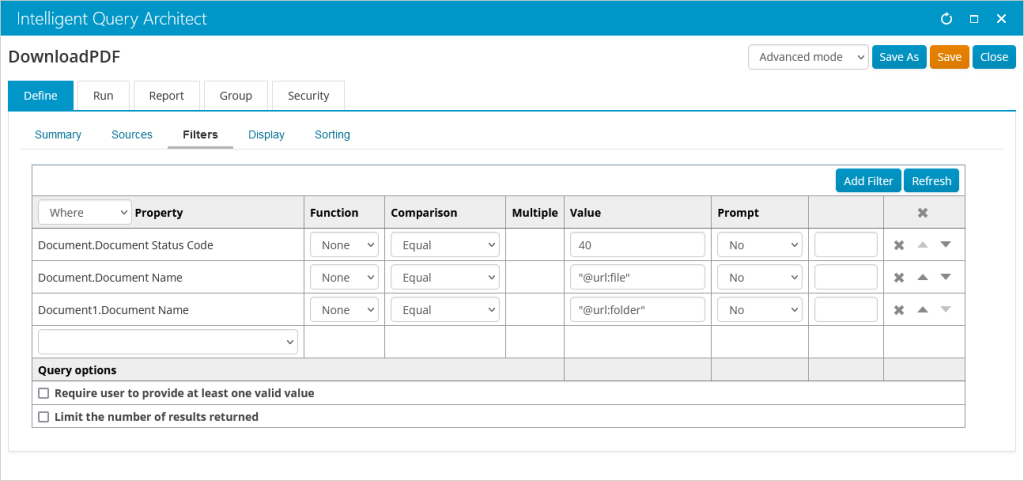
On the Filters tab, specify that Document.Document Status Code must equal 40, Document.Document Name must equal “@url:file”, and Document1.Document Name must equal “@url:older”.

Screenshot of IQA Filters tab

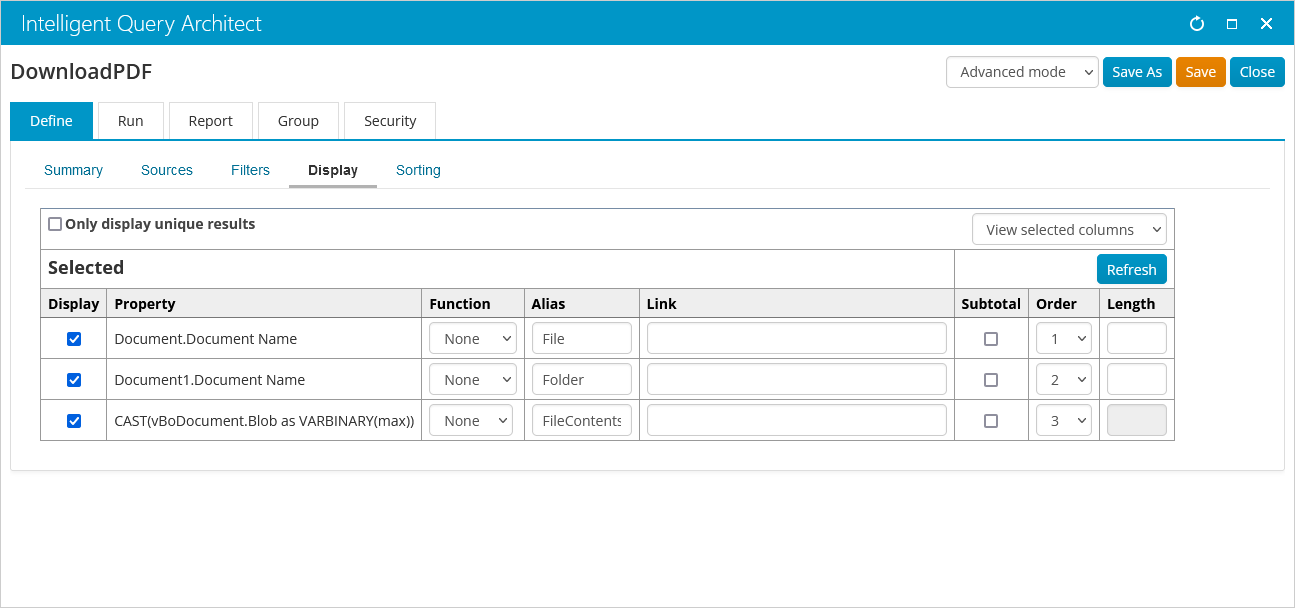
On the Display tab, select Document.Document Name and give it an Alias of File, and select Document1.Document Name and give it an Alias of Folder. Add a custom SQL Expression of CAST(vBoDocument.Blob as VARBINARY(max)) and give it an Alias of FileContents.

Screenshot of IQA Display tab

Finally, be sure to save your query.

Creating your iPart

I’m using pdf-lib to prepare the contents of PDFs stored in the iMIS database for end users. Even the minified version of pdf-lib weighs in at around half a megabyte in size, which is too large to stuff into a Content Html iPart in a RiSE webpage record, so you can work around that limitation by creating a client-based iPart containing the pdf-lib JavaScript file.

In addition to pdf-lib, I’m using the dandavis download script to handle delivery of PDF files to users’s browsers.

For the purposes of this tutorial, I’m naming my iPart KBpdflib.

Download both scripts and place pdf-lib.min.js and download.min.js in a folder on your computer. In the same folder, save a third file named index.html with the following contents, replacing KBpdflib with whatever name you’re using for your iPart:

<script src="/Areas/KBpdflib/pdf-lib.min.js"></script>
<script src="/Areas/KBpdflib/download.js"></script>

Place both JavaScript files and your newly-created index.html in a ZIP file named KBpdflib.

Uploading your iPart

Navigate to RiSE > Document system, then open the ContentItems directory. Go to New > Zip file and select the ZIP file you created.

Next, navigate to RiSE > Maintenance > ContentTypes. If desired, create a subfolder by going to New > Folder, then go to New > Content Type. Give your iPart a name (e.g., KBpdflib) and, if desired, a description; set both URL fields to ~/Areas/KBpdflib/index.html, where KBpdflib equals the name of the ZIP file you uploaded; and then save your Content Type record.

Finally, navigate to RiSE > Maintenance > Deploy Content Items and click the Deploy Content Items button. Assuming everything processes normally, your iPart should now be uploaded.

Identifying a PDF to download

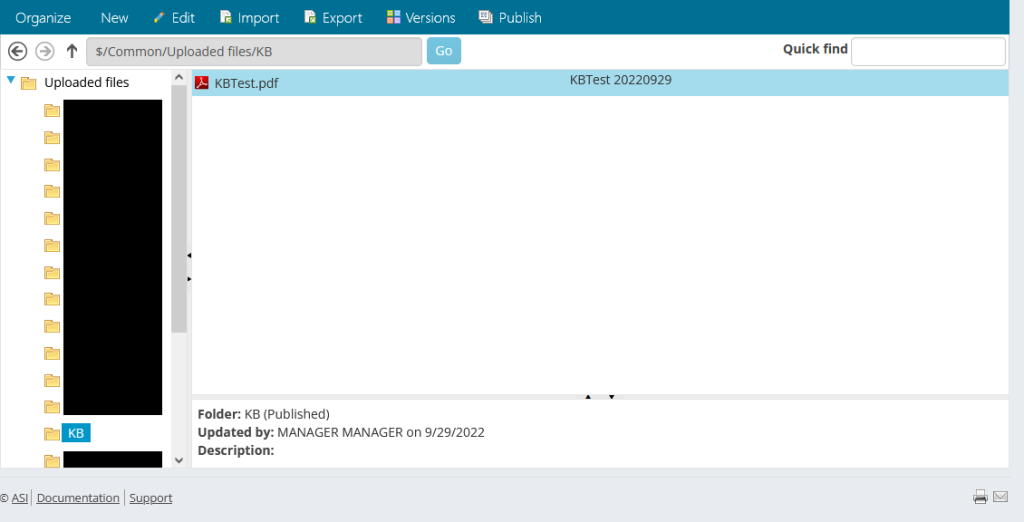
Navigate to RiSE > Page Builder > Manage files. If you have not previously uploaded any PDF files, you’ll need to upload one now; otherwise, make a note of the names of an existing file and the folder in which it exists.

For the purposes of this tutorial, I’m using a file named KBTest.pdf located in the folder named KB.

Creating a webpage to download the PDF file

The heavy lifting is finished at this point; all that’s left to do is create a webpage that makes use of your IQA query and the iPart you created. To do that navigate to RiSE > Page Builder > Manage content; after selecting the folder where you want to store your page, go to New > Website Content.

Give your page a Title and Publish file name, then click Add Content. Select the iPart you uploaded earlier and click OK to insert it into the new page.

Next, click Add Content again and insert a Content Html iPart. Configure that iPart to contain the following HTML code:

<h1>DownloadPDF</h1>
<div id="json-results">
    <label for="kb-folder-name">Folder</label>
    <input id="kb-folder-name" name="kb-folder-name" type="text">
    <label for="kb-file-name">File</label>
    <input id="kb-file-name" name="kb-file-name" type="text">
    <button id="kb-submit" name="kb-submit" value="Submit">Submit</button>
</div>

After that, click Add Content one more time and insert a second Content Html iPart. Configure that iPart to contain the following JavaScript code:

<script type="text/javascript">

    const noResults = "PDF not found.";
    const ajaxError = "The PDF failed to load. Please try again.";
    
    
    document.getElementById("kb-submit").addEventListener("click", function(event) {
        event.preventDefault();
        downloadFile(document.getElementById("kb-folder-name").value, document.getElementById("kb-file-name").value);
    });
    
    
    // retrieve JSON for specified PDF
    function downloadFile(folder, file) {
    
        // maximum number of results to be returned
        const maxResults = 10;
        
        // set URL for API call to retrieve PDF
        let apiURL = "/api/IQA?QueryName=$/KB/DownloadPDF&folder=" + folder + "&file=" + file + "&Limit=" + maxResults;
        
        // make ajax call to API
        jQuery.ajax(apiURL, {
            type: "GET",
            contentType: "application/json",
            headers: {
            
                // we pass __RequestVerificationToken value from webpage so API will return results
                RequestVerificationToken: document.getElementById("__RequestVerificationToken").value
            },
            success: function(data) {
            
                // display results if any were found
                if (data["TotalCount"] > 0) {
                
                    let fileName = "";
                    let folderName = "";
                    let fileContents = "";
                    
                    // loop through values in JSON string
                    for (let i = 0; i < data["Items"]["$values"].length; i++) {
                    
                        // get properties for specific record, then loop through them
                        let record = data["Items"]["$values"][i]["Properties"]["$values"];
                        for (let j = 0; j < record.length; j++) {
                            
                            if (record[j].Name == "File") {
                                fileName = record[j].Value;
                            } else if (record[j].Name == "Folder") {
                                folderName = record[j].Value;
                            } else if (record[j].Name == "FileContents") {
                                fileContents = record[j].Value["$value"];
                            }
                        }
                    }
                    
                    // call script to generate PDF
                    generatePDF(fileName, fileContents);
                } else {
                    alert(noResults);
                }
            },
            error: function() {
                alert(ajaxError);
            }
        });
    }
</script>
<script>
    const { degrees, PDFDocument, rgb, StandardFonts } = PDFLib;

    async function generatePDF(fileName, fileContents) {
    
        // load file contents retrieved from API
        const templatePdfBytes = fileContents;
        const templateDoc = await PDFDocument.load(templatePdfBytes);
        
        // serialize PDF document to bytes (a Uint8Array)
        const pdfBytes = await templateDoc.save();
        
        // trigger browser to download the PDF document
        download(pdfBytes, fileName, "application/pdf");
    }
</script>

Click the Save and Publish button to save your new page, then access the page using your browser. Enter you folder and file name in the appropriate input fields and click the Submit button, and the browser should indicate it is downloading the specified PDF.

So, what exactly is going on here? After passing a folder name and file name as part of our API call in the downloadFile function, we’re taking the binary data for the PDF that the API returns and passing it into the generatePDF function, then using PDFDocument.load to provide that data to pdf-lib. pdf-lib then turns it into a downloadable PDF. Pretty neat!

Caveats

This approach does make it possible to deliver PDF files for which links did not exist on a RiSE webpage at the time the page was initially loaded, but there are a few caveats:

  1. The IQA we created assumes that you have no duplicated folder name/file name combinations. If you have multiple folders with the same name in RiSE, and each of those folders contains files with the same names, the IQA will return data for all matching folder/file combinations. If, on the other hand, you have no folder name duplication, then there’s no problem.
  2. Retrieving a PDF via the API is slower than using iMIS’s built-in JavaScript links. For relatively small files, the difference may not be significant, but in my testing, multi-megabyte PDFs take significantly longer to download when retrieving the data via the API. With the JavaScript links, the user’s browser will at least display an indication of progress as the file is download; using the API, there’s no indication of any progress until the data has completely downloaded and is ready to go.
  3. An end user could access any published PDF file that exists in RiSE if he or she knows or can guess the folder and file name and has sufficient permissions to access the folder and file. Before implementing the approach outlined here in a production scenario, you’ll want to ensure any PDF content records that should not be accessible to all users have their permissions set appropriately in RiSE.

In spite of those potential issues, this approach could still be useful. For example, you could create another IQA that retrieves the names of all PDF files stored in a particular RiSE folder, use that query to dynamically generate a list of links on your webpage, and have each link kick off downloading a PDF via the API.

iMIS displays generic error when user attempts to download uploaded file

While uploading and linking to PDF files in RiSE with iMIS version 20.2.65.9955, I encountered an interesting bug, but I also identified a workaround. Today, I’ll share both the bug and the workaround here.

The particular page with which I was working uses the Content Collection Organizer iPart to display content from other content records within tabs. I observed that if I create a link to a PDF that has been uploaded in RiSE in the content record for one of the tab content areas, or subpages if you like, then publish the record, the website displays a generic error when I click the link to download the PDF:

An unexpected iMIS error has occurred. Please try your operation again; if you still receive an error, contact the system administrator.

That’s not very helpful, so I took a look at Event Viewer on the server and noted an HttpException with the following message:

Exception message: Failed to load viewstate. The control tree into which viewstate is being loaded must match the control tree that was used to save viewstate during the previous request. For example, when adding controls dynamically, the controls added during a post-back must match the type and position of the controls added during the initial request.

Interesting. Something’s happening in the iMIS/RiSE back-end code, then, which I can’t modify.

I did identify a workaround, however. If I create a download link in the main content record and publish that record, the links in the tabbed areas then function normally! Creating a standard link (e.g., with an href value of “#” or “/”) does not make this work correctly; the link must be in the format that RiSE uses when you link to a PDF that was uploaded to RiSE—i.e., with an href value like “javascript://[*]”.

The link apparently does not have to contain any text, however; it simply must exist. The presence of the following in the main page’s content record is sufficient:

<a href="javascript://[]"></a>

The link is not visible to the user because there’s no text, but it is the “magic sauce” that makes the PDF links within the tab content function as expected.

Using PHP and curl to post JSON data to the iMIS API

As a programming challenge, I recently decided to tackle using PHP and curl to connect to the iMIS API from outside the confines of RiSE. It’s relatively simple to get data from the iMIS API when you’re already logged in to an iMIS website, but I wanted to figure out how to post data to the API from an entirely different server. Documentation refers to this as direct access.

For my experiment, I created a PHP file on an external server. From a webpage within an instance of iMIS, I posted JSON data to my PHP file, which in turn retrieved an authorization token from iMIS and then used that token to submit the data to to the API.

<?php


// full URL of iMIS site
$url = "https://www.example.org";

// iMIS user's credentials
$username = "testuser";
$password = "testpassword";


if ($_SERVER["REQUEST_METHOD"] == "POST") {

    // JSON submitted by POST
    $json = file_get_contents("php://input");
    
    // ensure API URL and JSON are defined
    if ($_REQUEST["url"] != null && $json != null) {
    
        // address from which we get a token
        $tokenURL = $url . "/token";
        // API address to which we post data
        $apiURL = $url . "/api" . $_REQUEST["url"];
        
        callAPI($tokenURL, $username, $password, $apiURL, $json);
    } else {
    
        header("HTTP/1.0 401 Bad Request");
        
    $html = <<<EOT
<!DOCTYPE html>
<html lang="en-US">
    <head>
        <meta charset="utf-8">
        <title>401 Bad Request</title>
    </head>
    <body>
        <p>401 Bad Request</p>
    </body>
</html>
EOT;
        
        echo $html;
    }
}


// used to pass Ajax call to API
function callAPI($thisTokenURL, $thisUsername, $thisPassword, $thisAPIURL, $thisJSON) {

    // grab an authorization token to send to API with POST
    $token = getToken($thisTokenURL, $thisUsername, $thisPassword);
    
    // token length will be this short only if an HTTP error status code was returned
    if (strlen($token) < 5) {
        header("HTTP/1.0 " . $token);
    } else {
    
        // this is the header we will send to API
        $header = array("authorization: Bearer " . $token, "Content-Type: application/json");
        
        // initiate curl instance
        $curl = curl_init();
        
        curl_setopt_array($curl, array(
            CURLOPT_URL => $thisAPIURL,
            CURLOPT_HTTPHEADER => $header,
            CURLOPT_SSL_VERIFYPEER => false,
            CURLOPT_RETURNTRANSFER => true,
            CURLOPT_POST => true,
            CURLOPT_POSTFIELDS => $thisJSON,
            CURLOPT_FAILONERROR => true
        ));
        
        $response = curl_exec($curl);
        
        // tell browser the result of the call
        header("HTTP/1.0 " . curl_getinfo($curl, CURLINFO_RESPONSE_CODE));
        
        curl_close($curl);
        
        return;
    }
}


// retrieve token for use in API call
function getToken($thisTokenURL, $thisUsername, $thisPassword) {

    // this is the username and password we will send
    $content = "grant_type=password&username=$thisUsername&password=$thisPassword";
    // this is the header we will send
    $header = array("Content-Type: application/x-www-form-urlencoded");
    
    $curl = curl_init();
    
    curl_setopt_array($curl, array(
        CURLOPT_URL => $thisTokenURL,
        CURLOPT_HTTPHEADER => $header,
        CURLOPT_SSL_VERIFYPEER => false,
        CURLOPT_RETURNTRANSFER => true,
        CURLOPT_POST => true,
        CURLOPT_POSTFIELDS => $content,
        CURLOPT_FAILONERROR => true
    ));
    
    $response = curl_exec($curl);
    
    $json = null;
    $returnStr = "";
    
    // return HTTP status code if there was an error; otherwise, return token
    if (curl_errno($curl)) {
        $returnStr = curl_getinfo($curl, CURLINFO_RESPONSE_CODE);
    }
    else {
        $json = json_decode($response, true);
        $returnStr = $json["access_token"];
    }
    
    curl_close($curl);
    
    return $returnStr;
}


?>

Naturally, you wouldn’t use something unsecured like this in a production environment; with the iMIS credentials pre-populated, anyone who hit the page could submit data to the API with no questions asked! Definitely a no-go. In addition, this PHP code retrives a new token every time it runs; that token should be saved and re-used until it expires.

Nevertheless, figuring out how to make this work was an interesting exercise, and I was able to connect to the iMIS API from outside the confines of RiSE. Such knowledge could come in handy somewhere down the road.

iMIS API returns “An error occurred while constructing the query”

While working with business objects, IQA, and the API for iMIS 20.2.65.9955, I recently encountered a strange error or undocumented limitation that had me scratching my head for a bit until I figured out what was happening.

To summarize, I created a business object in RiSE, then used that business object to build an IQA query. I was able to run the IQA query and view the results within RiSE with no problems. I was also able to run the generated SQL query displayed on the IQA Summary tab directly against the database without encountering any errors.

When I attempted to use the iMIS API to retrieve the query results, however, the API returned the message, An error occurred while constructing the query. This didn’t make much sense to me since the query ran just fine within RiSE. What was going on?

After some experimentation, I determined that the API returns that error if the IQA query being called uses a business object with a name greater than 32 characters long. In other words, a business object named “KB1_MyBusinessObjectNameIsTooLong” will cause problems, but a business object named “KB1_MyBusinessObjNameIsJustRight” will not. Without knowing what the API is doing behind the scenes, I can’t explain exactly why this happens.

The solution is, of course, not to use business object names more than 32 characters long if you intend to retrieve the results of an IQA query using the iMIS API.

How to retrieve and display data using IQA and the iMIS API

In April, I started a new job. Among my duties at this point is working on converting the organization’s C#-based web parts to IQA queries and JavaScript widgets that make use of the API provided by ASI’s iMIS.

ASI’s API documentation is very thorough in some places, and frustratingly fragmentary in others. My goal here is to explain how to create a basic IQA query, which is easy enough, and to provide working HTML and JavaScript that will allow you to run that query that returns records with a specific last name and display the results to an iMIS-based website user.

As a reference point, I am using iMIS 20.2.65.9955 as the basis for this tutorial.

Building your IQA query

To begin, access your iMIS staff site, perhaps at https://www.example.org/Staff, and go to RiSE > Intelligent Query Architect. You’ll see a number of existing folders. I recommend creating a folder and if necessary subfolders of your own so that you can easily keep track of the queries that you create. For purposes of the JavaScript code I’ll share later on, I’ll name my folder MyTests.

Click New > Query, then enter a name for your query. For purposes of this tutorial, I’m going to name my query LastName-Test.

  • On the Sources tab, click Add Source. Double-click the CsContact business object listed in the window that appears, or select it and click OK.
  • On the Filters tab, select Full Name from the Property select box in the first row, then click + to ensure the filter is added to the query. In the second row, select Name (Last, First) from the Property select box, enter "@url:LastName" (with the double quotes) in the corresponding Value box, and then click + in that row.
  • On the Display tab, you can choose which pieces of information you want available in the query. The only one with which we’re concerned for this tutorial is Full Name, which is checked by default.
  • On the Sorting tab, choose Name (Last, First) from the Property select box, then click + to ensure the sorting is added to the IQA.
  • Finally, if you want everyone to be able to see the results even if they’re not logged in to the website, select Share (Everyone) on the Security tab.

Click Save. Your IQA query is complete!

Displaying IQA results on a webpage

iMIS offers some iParts such as Query Menu that do a fine job of displaying results so long as you don’t need to apply special formatting or manipulate it in some way. For this tutorial, I’m not going to use those iParts, but will instead demonstrate how to use HTML and JavaScript including jQuery which is part of the iMIS website in order to display results.

On the iMIS staff site, navigate to RiSE > Page Builder > Manage content, navigate to a folder, and choose New > Website Content. Enter a Title and Publish file name, then click Add content and choose the Content HTML iPart. Select the HTML tab and then enter the following HTML:

<div id="imis-json-results" class="json-results">
    <p id="imis-json-results-loading" class="loading-results">Loading results…</p>
</div>

This is the container into which we’ll load the results retrieved from our API call.

Next, enter the following JavaScript:

<script type="text/javascript">
    // we’ll display these messages only if results can’t be displayed
    var msgNoResults = "No results found.";
    var msgAjaxError = "The results failed to load. Please try again later."
    
    // create unordered list for insertion into DIV#imis-json-results
    var resultList = document.createElement("ul");
    resultList.id = "imis-results";
    
    // set URL for API call to retrieve names
    // note the QueryName parameter includes folder name and IQA query name
    // the LastName parameter is used due to the "@url:LastName" that we entered while building our IQA query
    // the Limit parameter defines the maximum number of results to be returned
    var apiURL = "/api/IQA?QueryName=$/MyTests/LastName-Test&LastName=Smith&Limit=500";
    
    // make ajax call to API to retrieve names
    jQuery.ajax(apiURL, {
        type: "GET",
        contentType: "application/json",
        headers: {
        
            // this line retrieves the __RequestVerificationToken value that iMIS automatically populates onto the webpage, eliminating the need for separate authentication
            RequestVerificationToken: document.getElementById("__RequestVerificationToken").value
        },
        success: function(data) {
        
            // if you want to see raw data returned by API, uncomment following line and view results in web browser’s developer console
            // console.log(data);
            
            // display results if any were found
            if (data["TotalCount"] > 0) {
            
                // loop through values in JSON string
                for (var i = 0; i < data["Items"]["$values"].length; i++) {
                    var fullName = "";
                    
                    // get properties for specific record, then loop through them
                    var record = data["Items"]["$values"][i]["Properties"]["$values"];
                    for (var j = 0; j < record.length; j++) {
                        if (record[j].Name == "FullName") {
                            fullName = record[j].Value;
                        }
                    }
                    
                   // create list item, list item to unordered list created earlier
                   var resultItem = document.createElement("li");
                   resultItem.innerHTML = fullName;
                   resultList.appendChild(resultItem);
               }
           }
           
           // eliminate loading message
           var loadingElem = document.getElementById("imis-json-results-loading");
           loadingElem.parentElement.removeChild(loadingElem);
           
           // append results or message indicating no results were found to DIV#imis-json-results
           if (data["TotalCount"] > 0) {
                document.getElementById("imis-json-results").appendChild(resultList);
            }
            else {
                var noResultsP = document.createElement("p");
                noResultsP.innerHTML = msgNoResults;
                document.getElementById("imis-json-results").appendChild(noResultsP);
            }
        },
        error: function() {
            // eliminate loading message
            var loadingElem = document.getElementById("imis-json-results-loading");
            loadingElem.parentElement.removeChild(loadingElem);
            
            // append ajax error message to DIV#imis-json-results
            var ajaxErrorP = document.createElement("p");
            ajaxErrorP.innerHTML = msgAjaxError;
            document.getElementById("imis-json-results").appendChild(ajaxErrorP);
        }
    });
</script>

Again, the Query Menu iPart may be sufficient for displaying very basic lists, but for more involved projects, this should at least give you a starting point for getting data out of your iMIS database using the API.